
When it comes to fabrication, flame control is key. Too little, your seam looks like sh*t and you risk it falling to pieces halfway through, too much you melt your metal while your flux sticks it's tongue out and laughs. After months of accidentally melting and, perversely NOT melting a frightening amount of things I'm finally starting to get the hang of the flame. So I thought I'd make a brief tutorial to share what I THINK I've learned. Please remember I am in NO way a professional and have been doing this less than a year so take whatever you can and leave the rest. If I have something terribly wrong please tell me, lol.
Oh, because I know someone will ask: I have a Bernzomatic mapp gas pro handheld torch, pics on my flick page.
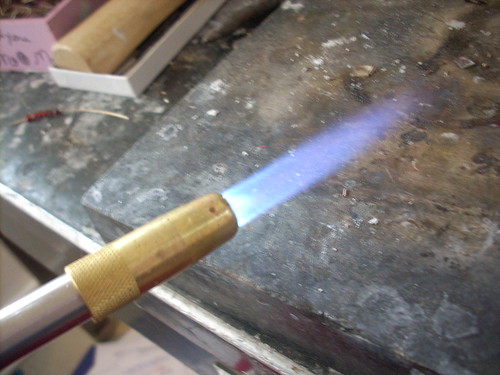
So first let's talk about bushy flame. Turn your torch on and gently let off the trigger until it's very close to going out, less than 25% of your overall power if you have a decent sized torch. This is an example of a soft, busy flame.

It's soft, it's friendly, it's like a warm hairdryer heating your metal just enough to melt the flux. You couldn't melt your metal or give your piece firescale with this flame if you kept it on here all day.
Now bring it up just a notch to maybe 25-30% of your total flame. That will give you a nice even head that will melt soft solder but doesn't come close to melting metal.
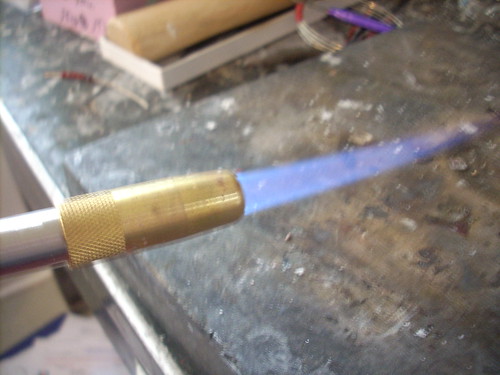
Now you want to melt medium or and gently work up to hard solder without melting overheating. You can smoothly and consciously increase your flame a little more, maybe 45-50% for just a few moments, always be in and out with this type of heat. Warm your piece for a few seconds with a flame like this:
Now that you've got your piece heated to right about annealing temp, hot but nowhere near melting, briefly flare your flame by pressing the trigger for just the briefest of seconds. Pull off the moment you see the sheen of molten solder through your seam and be looking cause it'll be there before you can blink.

Let's say you don't want to solder at all or are fusing or balling. Gently bring it to temp and go up to maybe 75% and you'll see the gleam as it goes molten. Only ever go to 100% if you are truly attempting to melt it down.

I hope this is helpful to you on your journey and I...
What? Seriously?
You still don't get it?
Ohmygawd...FIIIINE...here's a video :D
So teamies, your task for the week is a sort of limber up before you solder, the do-ray-me-fa-so-la of metalsmithing. Before you start practice going up and down smoothly and consciously before you solder, envision the flame...be one with the flame...
lol. good advice!
ReplyDeleteYou have a trigger control? That would make my soldering life so much easier! I need two hands to adjust my flame like that.
ReplyDeleteEwww julie, you don't have a trigger? How do you LIVE?
ReplyDeleteBWAAHAHAHAHA.... love it. :D
ReplyDeleteOmmmm..... I am one with the flame...the flame...ommm.....
I have to remember this one when I get a REAL torch.... instead of the butane-kitchen-torch I have now. But hey.... I'm soldering on the kitchen stove under the kitchen fan so I guess the torch is approporiate. LOL
That trigger action looks like it's a key element to "becoming one with the flame"...now if I could find one of those with a hose attached so I wouldn't have to hold the canister that would be nirvana :)
ReplyDeleteThat is one thick flame, lady!
ReplyDelete